Connecting my Christmas jumper to the Internet
Some of you will be aware that while I'm not necessarily great at it, I enjoy playing around with hardware. One of the talks that I've been fortunate enough to travel the world to give is about using JavaScript to do bits of home automation, including automating my curtains and making my own thermostat.
So it may come as no real surprise that when I heard there was going to be a Christmas jumper competition at work last year, I decided add LEDs to my jumper and connect it to the Internet.
Step 1 - The jumper
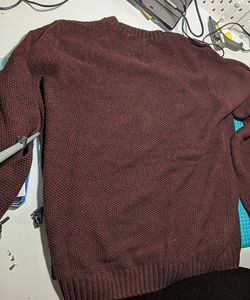
I didn't want to start with an off-the-shelf Christmas jumper, that feels a little like cheating. Instead, I decided to get a plain jumper and add my own stuff to it. I went with a dark red jumper with a chunky knit from Primark that cost £8.
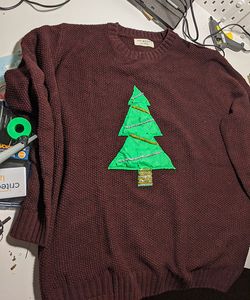
I then started thinking about what I was going to do for the design. The most obvious idea to me was a Christmas tree, as I could scatter LEDs over it and light it up like an actual Christmas tree.
As I'm no good at sewing and don't possess a sewing machine, I asked my sister Cerise![]() for her help at this stage. I cut a Christmas tree shape out of felt, and she sewed it onto the jumper for me.
for her help at this stage. I cut a Christmas tree shape out of felt, and she sewed it onto the jumper for me.
Once that was done, I got some sparkly pipe cleaners and used a hot glue gun to attach them to the felt in a tinsel-like design. At this stage I also marked and poked holes in the felt for where the lights would come out.
Step 2 - The lights
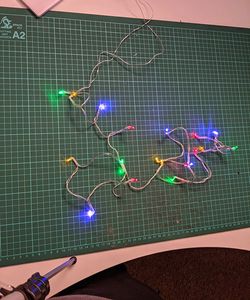
For the lights I started with a set of battery powered Christmas lights that I bought for £1. I chose these because the fact that they were battery powered meant I could wire them up to a microcontroller and control the power to them to make them flash or fade.
One of the boards that I love to use when I build things is the ESP8266 as it's cheap, has wifi and, by flashing Espruino![]() on it, can be programmed with JavaScript.
on it, can be programmed with JavaScript.
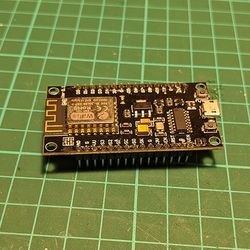
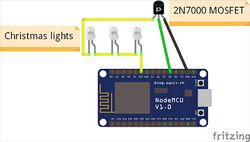
The Christmas lights were originally powered by 2 AA batteries in series, which means that 3 volts of power were being delivered to the lights. The ESP8266 has a 3.3v pin, which I used to power the lights instead.
To be able to control the lights, I used a transistor connected between the lights and the ground pin, with the control pin connected to one of the GPIO pins on the ESP8266. This meant that I could control the resistance that the transistor was providing, and could use it to dim or flash the lights. You can see a wiring diagram below.
Step 3 - Putting it together
The last step of the hardware side was putting the lights in the jumper. As I'd already created holes in the felt for the lights, I just needed to get the lights through the jumper itself.
Part of the reason that I chose the chunky knit jumper was so that I can push the lights through the gaps in the knit and then push it through the holes in the felt.
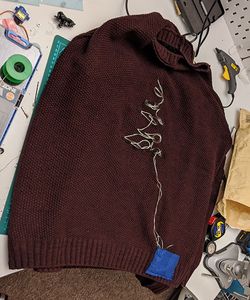
One issue that I ran into was the lights shifting and occasionally falling behind the felt. This was pretty annoying, but fix was pretty easy. I added a dab of hot glue to each light to hold it onto the felt.
Step 4 - Controlling the lights
An Internet connected Christmas jumper isn't complete without being connected to and controlled from the Internet.
As mentioned earlier, I'm using the ESP8266. It has wifi which means I can do some communication. When I'd attended JSHeroes in 2018, Stephanie Nemeth talked about connecting her LED projects to the Internet. One of the key takwaways for me was that sockets aren't necessarily the greatest way to connect, and that MQTT may be better. Stephanie's talk is up on YouTube .
.
With this in mind, I set about building the software with MQTT as the communication method. As part of Espruino there's a MQTT module, which makes the hardware side easy. On the web side I chose to use MQTT.js![]() , and I chose shiftr.io
, and I chose shiftr.io as my MQTT broker.
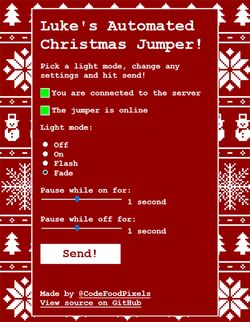
I'm not going to go super in-depth on the web app, but I used plain JavaScript, HTML and CSS to build a form for the various ways to control the lights. With the fade and flash options, the user has the choice of controlling how long the lights stay on and off for. As I use MQTT, I don't need any server-side code for this app which means that I can deploy it as a static site on Netlify![]() .
.
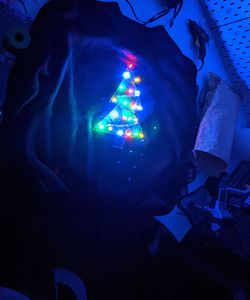
The final product
I'm super happy with the final product. It's great fun to have people play with it, even from across the world!
You can find all of the code in the jumper-lights repo![]() on my github, and below is a video of my friend Beth controlling it!
on my github, and below is a video of my friend Beth controlling it!